Input/Output Configuration Tab

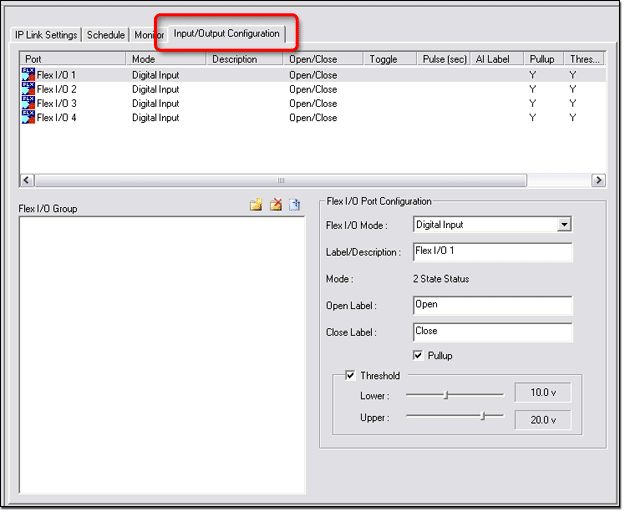
The Input/Output Configuration tab is present when one of the following ports is selected in the IP Link Tree window:

Flex I/O Ports

Flex I/O Ports are found on the following devices:

  • IPL T SF24

  • IPL T SFI244

Flex I/O Ports can be configured in three different ways:

  • Analog in

  • Digital in

  • Digital out

Flex I/O Ports allow IP Link devices to accept an input voltage and then send out a serial command to trigger another event. These ports can support TTL and analog signals from 0 to 24 volts, allowing a wide variety of devices to be controlled and monitored.

Analog Inputs to Flex I/O Ports

Flex I/O Ports can be configured to receive analog voltages for use with photo sensors, level feedback, strain gauges, thermocouples, variable potentiometers and other devices. Incoming analog voltages from 0 to 24 volts are sampled with 12-bit precision.

For example, a thermal sensor installed in an equipment rack can be connected to one of the Flex I/O inputs, and the IP Link  device can be configured to send an e-mail message, turn on auxiliary cooling fans and turn off equipment if the rack temperature exceeds a specified temperature value.

Digital Inputs to Flex I/O Ports

Configured as digital inputs, the Flex I/O ports can connect to switches, motion sensors, moisture sensors and tally feedback. This provides the ability to receive status from a variety of devices including projector lifts, motorized projection screens, room partition switches, and push buttons.

Digital Outputs from Flex I/O Ports

When configured as digital outputs, the Flex I/O ports can drive LEDs, 24 volt incandescent lamps, an additional external power supply, or other devices that accept a TTL input signal. For applications that require contact closure control, the Flex I/O ports can interface with an Extron IPA T RLY4, an IP Link  accessory featuring four isolated relays.

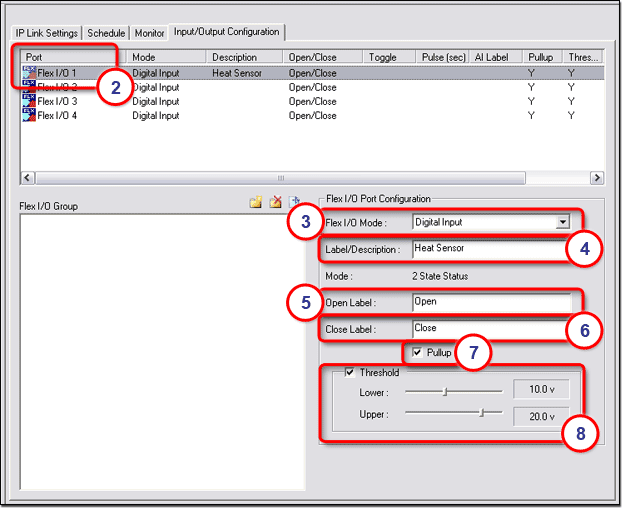
To configure a Flex I/O Port:

  1. Select a Flex I/O folder in the IP Link Tree window.

  2. Select a Flex I/O Port in the Input/Output Configuration window (see below).

  3. Select the Flex I/O Mode.

    1. Digital Input

    2. Digital Output

    3. Analog Input

  4. Enter a unique Description.

  5. Enter a unique Open Label.

  6. Enter a unique Close Label.

  1. Click the Pullup checkbox if desired. If Pullup is selected the signal line will be connected to a positive voltage through a pullup resistor which prevents the signal line from floating to an in between state when not active.

  2. Click the Threshold checkbox if desired. Set the Lower and Upper threshold limits. The Threshold options allows you to set signal levels at which the port will activate and de-activate.

Contact Input Ports and Relay Ports

The IPL T CR48 has:

  • Four Contact Input ports

  • Eight Relay ports

The Contact Input ports and Relay ports can be used to control screens, timers, lights, motion sensors, and more as shown below.

Contact Input Ports

Contact Input ports can receive 0-5 VDC TTL input signals from devices such as screens, timers, lights, and motion sensors in order to track the status of such devices.

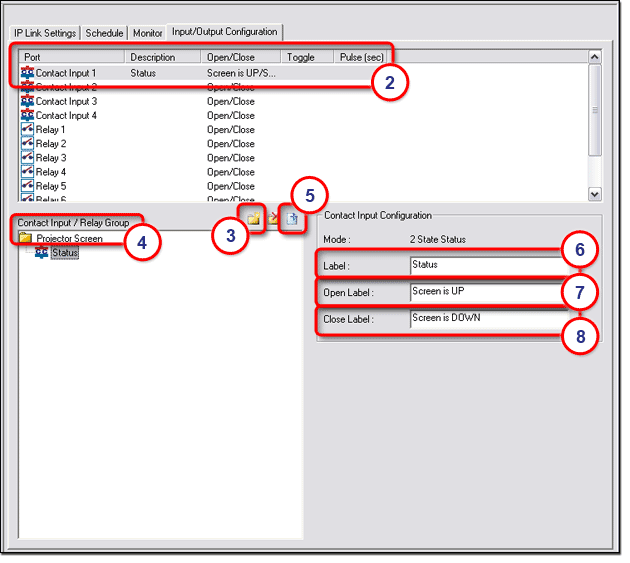
To configure a Contact Input port:

  1. Select a Contact Input folder in the IP Link Tree window.

  2. Select a Contact Input in the Input/Output Configuration tab (see below).

  3. Click the Add icon in the Contact Input / Relay Group window.

  4. Enter a unique folder name (example: Projector Screen).

  5. Click the Add I/O Port to Group icon.

  6. Enter a unique Label name (16-character maximum - Example: Status).

  1. Enter the desired Open Label description (16-character maximum - Example: Screen is UP).

  2. Enter the desired Close Label description (16-character maximum - Example: Screen is DOWN).

  3. Perform a  Build Changed Configurations.

Note: Before changes are viewable in GlobalViewer, you must perform the build and upload process in Global Configurator.

To view the Contact Input label in GlobalViewer:

  1. Select a GlobalViewer Host device in the IP Link Tree window.

  2. Right-click on the Host device name and click  Open GlobalViewer®  Webpage.

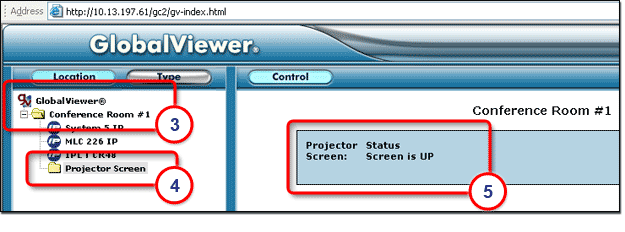
The GlobalViewer®  web page opens (see below).

  1. Expand the GlobalViewer®  folder (click the + sign).

  2. Select the Contact Input folder -
    ex: Projector Screen.

The following information is displayed in the Control (right) window (5):

  • Folder name - ex: Projector Screen

  • Label - ex: Status

  • Open Label - ex: Screen is UP

Note: If the current status of the projector screen is down, the Close Label (Screen is DOWN) would be displayed here.


Relay Ports

Relay ports provide the capability to control a wide range of audio/visual devices such as screens, lights, projector lifts, etc.

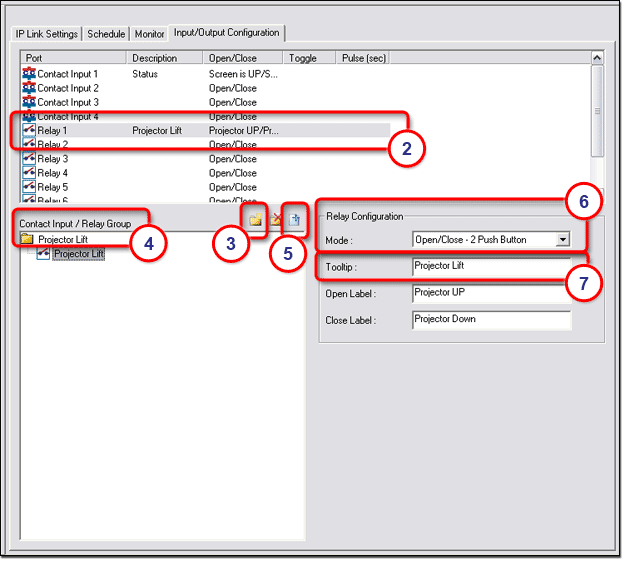
To configure a Relay port:

  1. Select a Relays folder in the IP Link Tree window.

  2. Select a Relay port in the Input/Output Configuration tab (see below).

  3. Click the Add icon in the Contact Input / Relay Group window.

  4. Enter a unique folder name (example: Projector Lift).

  5. Click the Add I/O Port to Group icon.

  1. Select the desired Mode:

    1. Open/Close - 2 Push Button

    2. Toggle - 1 Push Button

    3. Pulse - 1 Push Button

Note: See a description of Mode options below.

  1. Enter the desired Tooltip.

  2. Enter the desired Open Label description.

  3. Enter the desired Close Label description.

  1. Perform a  Build Changed Configurations.

Mode Options

The button labeling options in the Relay Configuration window differ depending on which Mode was chosen in step 6 above.

  1. Open/Close - 2 Push Button

    In this configuration there are two distinct buttons created for the GlobalViewer interface, with two separate button labels.  One button provides the relay open condition, and the other button provides the relay closed condition.

  1. Toggle - 1 Push Button

    In this configuration, there is only one button that acts as a toggle switch. The first press closes the relay, and the next press opens the relay.

    Enter the desired button label in the Toggle Label field.

  1. Pulse - 1 Push Button

    In this configuration there is only one button that closes the relay for the duration of time selected in the
    Pulse Time field.

    Enter the desired button label in the
    Pulse Label field.


Note: Before changes are viewable in GlobalViewer, you must perform the build and upload process in Global Configurator.

To view the Relay button captions in GlobalViewer:

  1. Select a GlobalViewer Host device in the IP Link Tree window.

  2. Right-click on the Host device name and click  Open GlobalViewer®  Webpage.

The GlobalViewer®  web page opens (see below).

  1. Expand the GlobalViewer®  folder (click the + sign).

  2. Select the Contact Input folder -
    Ex: Projector Lift.

The following information is displayed in the Control (right) window (5):

  • Folder name - ex: Projector Lift

  • Open Button - ex: Projector Up

  • Close Button - ex: Projector Down